Vinyl sales are on the rise and in 2016 the earnings from vinyl sales surpassed those from digital downloads. This is good news for artists, physical media presents the most profitable means for them to distribute their music.
Despite the efficiencies of streaming and downloads, unfortunately the business models are designed according to the requirements of an oligopoly. In this post I’m going to break down how you can produce your own record and take advantage of a growing trend in how people consume music, and depending on whom you ask – achieve the very best sound.
Music
Firstly, post-recording of your music, you want to make sure that it’s been mastered to the best possible level. There is a common misconception that to produce records the music must be mastered by analogue, this just isn’t true. It’s true that analogue mastering is best suited to vinyl, but you can produce equally high quality sound from digital mastering too.
You want to keep in mind that vinyl records do not hold data according to file sizes as we have become accustomed to in the digital age. Different record formats have different requirements:
Record Formats
7″ Records – (often referred to as 45’s) can be cut at 45rpm or 33⅓rpm. When cut at 33⅓rpm you can have more minutes per side, yet the sound quality deteriorates the more content you want to press on a record (you’re better off enlarging the format than compressing the content and sticking with 45rpm for a 7″). You have a choice of 7″ records with small and large (jukebox style) centre holes.
10″ Records – (same size as classic 78’s) can be cut at 45rpm or 33⅓rpm (they can also be cut at 78 but few would be able to listen to them).
12″ Records – both the standard LP size cut at 33⅓rpm and the standard for club DJ’s cut at 45rpm. You can also press as a heavy 180g record (standard is 140g).
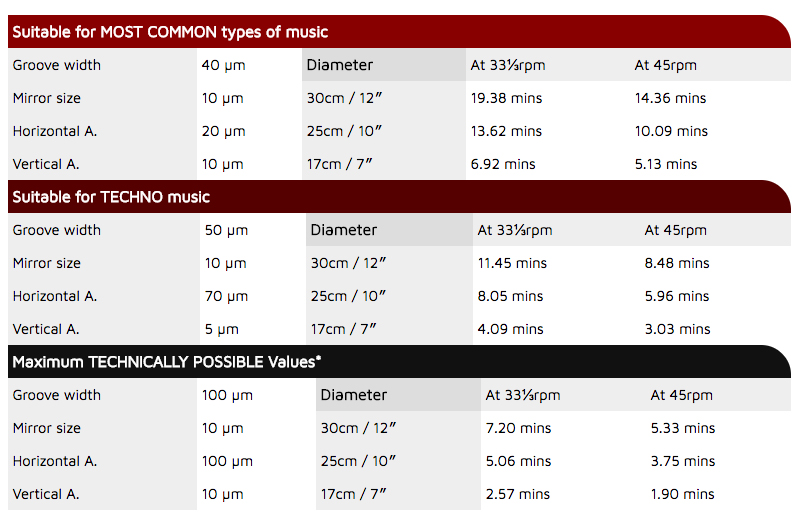
The table below contains theoretically accepted lengths for the various disc formats and music types:

The engineer will need to provide you with high quality wav files for pressing. Do not attempt to use MP3s or any other compressed file formats to press vinyl, this affects sound quality. Before handing in your audio master to a manufacturer, ensure the music is ready for production and you have already approved the dynamics and range of frequencies with no further need for alteration.
Artwork
You will want to decide upon a packaging option for your record before designing the artwork. If you’re not familiar with design software, it may be advisable to get some assistance from a designer for this. Or, if you’d like to minimise your costs, there are some free software options out there that you can use. Design For Music, Canva and Softonic are a couple of examples.
There are some technical requirements you will need to be mindful of. Manufacturers commercially print covers, labels and inserts, and they are quite specific about their requirements. When preparing your artwork files, keep in mind the following information:
- Colour images must be prepared in CMYK (NOT colour RGB, which is often the default setting with software)
- Resolution of colour images and images in greyscale – minimum 300 dpi in actual size!
- Resolution of black and white images (monochrome) – minimum 800 dpi in actual size!
- Files must not contain images in DCS1 or DCS2 (separated EPS) format, images in EPS format with postscript colour management or ICC profiles.
- For all types of printed materials, add a minimum bleed of 3 mm to each outer edge.
- Ensure the final size is indicated by crop marks.
- Covert the files to PDF to ensure all fonts and images are rasterized.
Purchase
It’s important to not underestimate the value of picking the correct supplier to produce your vinyl. There are a myriad of suppliers out there using different techniques and methods of producing the same medium. There are also differences in printing methods right down to the turnaround times – some suppliers can deliver to you within 6 weeks, whilst some can make you wait as long as 14 weeks. It’s important to be mindful of this – especially if you have taken pre-orders or you want to coordinate the vinyl release with an event arranged for a specific date. When preparing to send your audio files to the suppliers you may want to consider the following:
- Intensive high tones such as S and F vocal sounds in singing, high tone instruments, synthetic sounds or squeaking and peeping noises, all may sound distorted in the playback and can also cause problems during the cut.
- Keep your acoustics at a range of 20 Hz and above, below 20Hz is not recommended in any event.
- You may want to assign a clever identification groove. These have no influence on the playback result, but can be a nice touch. See George Peckham’s A Porky Prime Cut.
- Assign a catalogue number to your Master (CD-R or WAV files) and associated artwork files. This will enable your materials to be easily identified. This can be a short abbreviation of your label and number of release, ABC-001 for example.
These steps can vary with some pressing facilities that have their own customs. I think it’s fair to say the above isn’t exhaustive and the benefits are worth the effort.

